


Article and media by Charley Phillips.
It is finally a new school year. Many of the students are coming back as sophomores, juniors or seniors. We welcome the new students and transfers to the campus for their first experience at Greenville College! Most of us are currently living on campus. Whether it’s in a house or dorm, we all have one problem…our room may not be the best looking room we have had. Sorry to say, but we could not bring our whole room from home with us. I totally get that. Although we could not bring it with us, here are some tips on how to spice up your room environment for little or no costs at all!
<br>
<br>

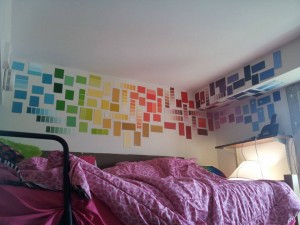
The first tip is free, the rest is put on your tab (jokingly though, this is free). I have seen this on Pinterest and also from friends that currently go to school at various colleges. It is pretty clever and fun to do! The base of this project is simply collecting different paint samples from various stores such as Wal*Mart. Once you find all needed samples, the only materials you need to purchase are the supplies to put the samples on the wall. Whether the person is going to be doing a rainbow color wheel or a variation of colors, that amount is up to how much wall is getting covered. The rest is up to you! Simply add them in a row, criss-cross, or place them randomly throughout the wall. Any way it is applied is going to be better than a plain vanilla colored wall! A way to spice up your room is color coordinating this project with your bedding. For instance, if a student has a bright lime color, add some coral or orange hues of paint samples. That way it is not too complementary but it is contrasting in a fabulous way! To get this tip on how to create a great project…just click the picture!
</br>
</br>

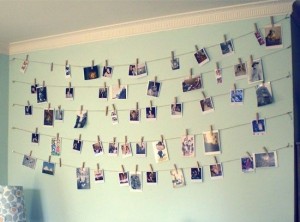
One of the best things that a student can bring are photos! Photos let memories, girlfriends, boyfriends, and most importantly family be present without physically being there. A boring way to display these are just sticking some tape on the back and slapping it on a wall. The second tip and the alternative to this crisis is to create a clothesline picture display! For more information, click on the picture! The materials for this project cost just under 10 dollars. These include, yarn (or string depending on what style is being created), clothes pins, and also a way to hold the string up. Whether that would be a thumb tack or tape! FYI: Make sure that the rules of housing can let holes be put into the walls when using thumb tacks or pins. When constructing this, make the string as long as desired, securely fastening it to the wall. If a draped look is wanted, make the string longer and add a middle tack to the string and have two (how ever many tacks are used) little drooped lines to hold the photos. The rest is easy! With the photos selected use the clothes pin to put the photos on the line and VIOLA! The final piece is very fun, and very different than sticking photos on a wall!
<br>
<br>

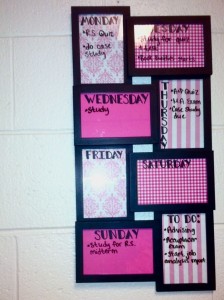
The final tip for creating the best dorm for this school year is making a schedule using a picture frame. There is nothing worse than to be unorganized. Buying a multi-frame photo display is the base of the project. Click on the picture for an awesome tutorial! It would be helpful to get at least a five frame display. Depending if the person wants to include the weekend, extra frames may be needed. The rest is up to the person. The background of each frame can be old stock paper, construction paper or even leftover paint samples from the first project. Simply hang up the frames with Command strips or nails, again…please follow the housing rules for the residence. Once the frame is up, get a dry erase marker and write the days of the week on each frame. Finally write down important dates, project dates or any miscellaneous notes that need to remind the student what needs to be done. This way a schedule is in the room and forgetting that a student forgot their planner because they had to write something down! It is a cute way to display the notes as well!! Click on the picture for an awesome tutorial!
<br>
Creativity throughout the school year can brighten up the experience at Greenville. Although there were not any tips on how to spruce up a guys dorm, I am sure that there are ways to help out their rooms as well! If you Google search for “Dorm Room Ideas” these are the ideas that pop up. It seemed redundant as I scrolled through for research. There are many ways students can dress up their dorm room, just search away and make it great!


